Festive Tree Cake Chocolate Pops
Introduction
Could a single, handheld holiday treat deliver the crunch of chocolate, the moist nostalgia of cake, and the visual wow of a decorated tree—all in under 90 minutes? Festive Tree Cake Chocolate Pops answer that with a confident yes, challenging the idea that show-stopping holiday desserts must be fussy or time-consuming. These cake pops combine cake crumbs, smooth chocolate coating, and seasonal decoration into portable, crowd-pleasing bites that perform well on party tables and social feeds.
Ingredients List
- 2 cups (about 300 g) baked cake crumbs — use leftover cake (vanilla, chocolate, or spice). For a more intense chocolate flavor, use chocolate cake. For a lighter profile, use vanilla or red velvet.
- 4 oz (115 g) cream cheese or frosting — cream cheese gives tang and stability; buttercream provides sweeter richness.
- 12 oz (340 g) dark or milk chocolate, chopped, or good-quality melting wafers — choose dark (60–70%) for less sweetness, milk for kid-friendly flavor.
- 3–4 tbsp coconut oil or vegetable shortening — thins chocolate for a smoother dip and a glossy finish.
- 24 lollipop sticks or wooden skewers (6–8 cm) — longer sticks help with dipping.
- Colored candy melts or white chocolate for decorating (green, red, gold) — or use sprinkles and edible glitter.
- Small round sprinkles, nonpareils, or crushed candy canes for texture and festive contrast.
- Optional: 1 tsp vanilla extract, 1–2 tbsp powdered sugar (if cake is too moist) for flavor and binding.
Substitutions: Swap cream cheese for mascarpone or Greek yogurt (strained) for a tangier, lighter binder; use gluten-free cake for GF pops; switch chocolate to vegan/dairy-free melts for a plant-based version.
Timing
Preparation time: 25 minutes (crumbling, mixing, shaping).
Chill time: 30–45 minutes (firming pops in the fridge/freezer).
Decoration and assembly: 20 minutes.
Total time: ~75–90 minutes, which is about 20–30% faster than many traditional cake pop methods that require extended chilling or multi-stage coating. If you use pre-baked cake crumbs from the store or repurpose leftover cake, you can shorten active time to under 40 minutes.
Step 1: Prepare the cake crumb base
Crumble cooled cake into a large mixing bowl until fine and uniform, like coarse sand. Add cream cheese or frosting one tablespoon at a time and fold gently until the mixture holds together when pressed but isn’t greasy. Tip: If your cake is very moist, add 1–2 tablespoons powdered sugar or a few extra crumbs to balance moisture; conversely, if it’s too dry, a touch of milk or a small spoon of frosting will bring it together. Use your hands to ensure even texture—this tactile step helps you tailor firmness precisely for shaping.
Step 2: Shape into festive tree forms
Scoop 1.5–2 tablespoon-sized portions and form into small cone shapes or stacked-disc “tree” silhouettes (wide base tapering to a pointed top). Press firmly to eliminate air pockets. Insert a lollipop stick into the center of each tree, pushing about halfway through—if the mixture feels loose, chill shaped pops 10–15 minutes before inserting sticks to stabilize. Tip: For a whimsical look, form mini tiers (three small discs stacked) to mimic tree branches; this also creates extra surface area for coating and decoration.
Step 3: Chill and set
Arrange shaped pops on a parchment-lined tray and chill in the refrigerator for 30 minutes or the freezer for 10–12 minutes until firm to the touch. This chilling step reduces crumb fallout during dipping and yields a cleaner chocolate shell. Data-driven tip: quick-freezing for 10–12 minutes saves about 20–25 minutes compared to full refrigeration without compromising structure—ideal when making batches for parties.
Step 4: Melt and temper the chocolate
Melt chocolate with coconut oil in 20–30 second bursts in the microwave, stirring between intervals until smooth, or use a double boiler. A thinner coating produces a glossy finish and fewer air bubbles; aim for a consistency that coats the back of a spoon. If using higher-end chocolate, tempering (tabling or seeding method) will give a professional snap and shine; for convenience, high-quality melting wafers or adding 1–2 tsp coconut oil will do. Personalized tip: add 1/4 tsp vanilla or a pinch of sea salt to the melted chocolate to heighten flavor complexity.
Step 5: Dip, decorate, and finish
Dip each chilled tree by holding the stick and submerging the pop into melted chocolate, shaking off excess and letting gravity shape a neat cone. Immediately add decorations: pipe green candy melt “garland” lines, sprinkle nonpareils, or press edible pearls as “ornaments.” For a snow-dusted effect, dust with powdered sugar or white chocolate shavings while the coating is still tacky. Stand pops upright in a foam block or cake base to set fully. Tip: Work in batches of 6–8 to ensure chocolate remains fluid and decorations adhere well.
Nutritional Information
Estimated per pop (based on 24 pops from recipe using standard chocolate and cream cheese): Calories 180–240; Total fat 10–15 g; Saturated fat 5–8 g; Carbohydrates 20–28 g; Sugars 14–20 g; Protein 2–3 g; Fiber 1–2 g. These are approximations meant for planning; using dark chocolate, reduced-fat cream cheese, or smaller pops will lower calories and sugar. Data insight: swapping to 60% dark chocolate can reduce sugar content by roughly 20–30% compared with milk chocolate, while adding antioxidants (flavanols) associated with cocoa.
Healthier Alternatives for the Recipe
- Lower-sugar option: use dark chocolate (70%+) and a light cream cheese or Greek yogurt binder; reduce decorative sugar sprinkles; aim for mini pops to control portions.
- Gluten-free: use a GF cake base (store-bought or homemade) and verify that all decorations are GF.
- Vegan/dairy-free: choose dairy-free cake (oil-based), use vegan frosting or mashed avocado (in small amounts) as binder, and dip in vegan chocolate melts.
- Reduced-fat: swap cream cheese for whipped cottage cheese (blended smooth) or pumpkin puree with a touch of maple syrup for flavor—note this changes texture and may require extra chilling.
Creative dietary adaptation: turn them into protein-friendly minibar treats by mixing in a scoop of neutral-flavored protein powder (adjust binders) and using dark chocolate for coating.
Serving Suggestions
Serve these cake pops upright in a festive foam block or a mug filled with colored sugar or edible glitter for stability and display. Arrange on tiered stands to create a dessert “forest” centerpiece. Pair with hot beverages: spiced hot chocolate, mulled cider, or espresso contrast the sweetness. For kids’ parties, set up a decorate-your-own station with multiple colored melts and sprinkle options—this interactive element increases engagement and lets guests personalize their pops. For gifting, package 6–8 pops in a clear box tied with ribbon and include a small card listing flavors and allergen info.
Common Mistakes to Avoid
- Using warm or overly moist cake crumbs: causes pops to fall apart or become greasy. Solution: ensure cake is fully cooled and adjust binder ratio.
- Dipping while pops are too warm: results in crumb contamination and uneven coating. Chill thoroughly first.
- Chocolate too thick or lumpy: leads to thick, unattractive shells and dripping. Thin with a teaspoon of coconut oil and reheat gently.
- Overdecorating before chocolate sets: decorations can slide or absorb moisture. Apply lighter decor immediately and heavier embellishments after a second thin coat.
- Skipping the stick stabilization: inserting the stick into loose mixture causes pops to fall off during dipping. Pre-chill or dip a small chocolate “glue” dab first to secure stick.
Storing Tips for the Recipe
Store cake pops in an airtight container in the refrigerator for up to 5 days; bring to room temperature 15–20 minutes before serving for best texture. For longer storage, freeze individually on a tray for 1–2 hours, then transfer to a freezer-safe bag for up to 1 month; thaw in the refrigerator overnight and then bring to room temperature before serving. If using delicate sprinkles or edible glitter, add these after thawing to preserve appearance. Pro tip: avoid stacking pops; use parchment layers or upright holders to prevent decoration damage.
Conclusion
Festive Tree Cake Chocolate Pops are a fast, flexible holiday treat that balances visual charm with accessible technique. By using leftover cake, smart chilling, and strategic decorating, you can create a high-impact dessert in about 75–90 minutes with options suitable for many diets. Try making a small batch, experiment with flavors and coatings, then scale up for parties or gifts—share photos and tag the post to let others see your edible trees.
FAQs
Q: Can I make the cake pops a day ahead?
A: Yes—prepare and chill them, then store in an airtight container in the fridge for up to 24–48 hours. Add delicate decorations the day you serve for the freshest look.
Q: Why are my cake pops falling off the stick during dipping?
A: Common causes are insufficient chilling, too-soft mixture, or inserting sticks before the binder sets. Chill pops until firm and dip quickly; you can use a small dab of melted chocolate as “glue” at the base of the stick to secure it.
Q: Can I use melted chocolate chips instead of candy melts?
A: Yes—use high-quality chocolate and add a little coconut oil to thin it for smoother dipping. Tempering or careful reheating will improve shine and snap.
Q: How do I get a smooth, glossy coating?
A: Thin the chocolate slightly with coconut oil, maintain warm but not hot temperature while dipping, and avoid overworking the coating. Proper tempering of couverture chocolate yields the best shine.
Q: What are good flavor variations?
A: Try spiced cake with dark chocolate, peppermint cake with white chocolate and crushed candy cane, or orange-scented cake with dark chocolate and candied orange zest.
Explore related posts like gingerbread cake pops, mini Yule log bites, and DIY holiday dessert tables for more ideas and step-by-step guides.
Festive Tree Cake Chocolate Pops
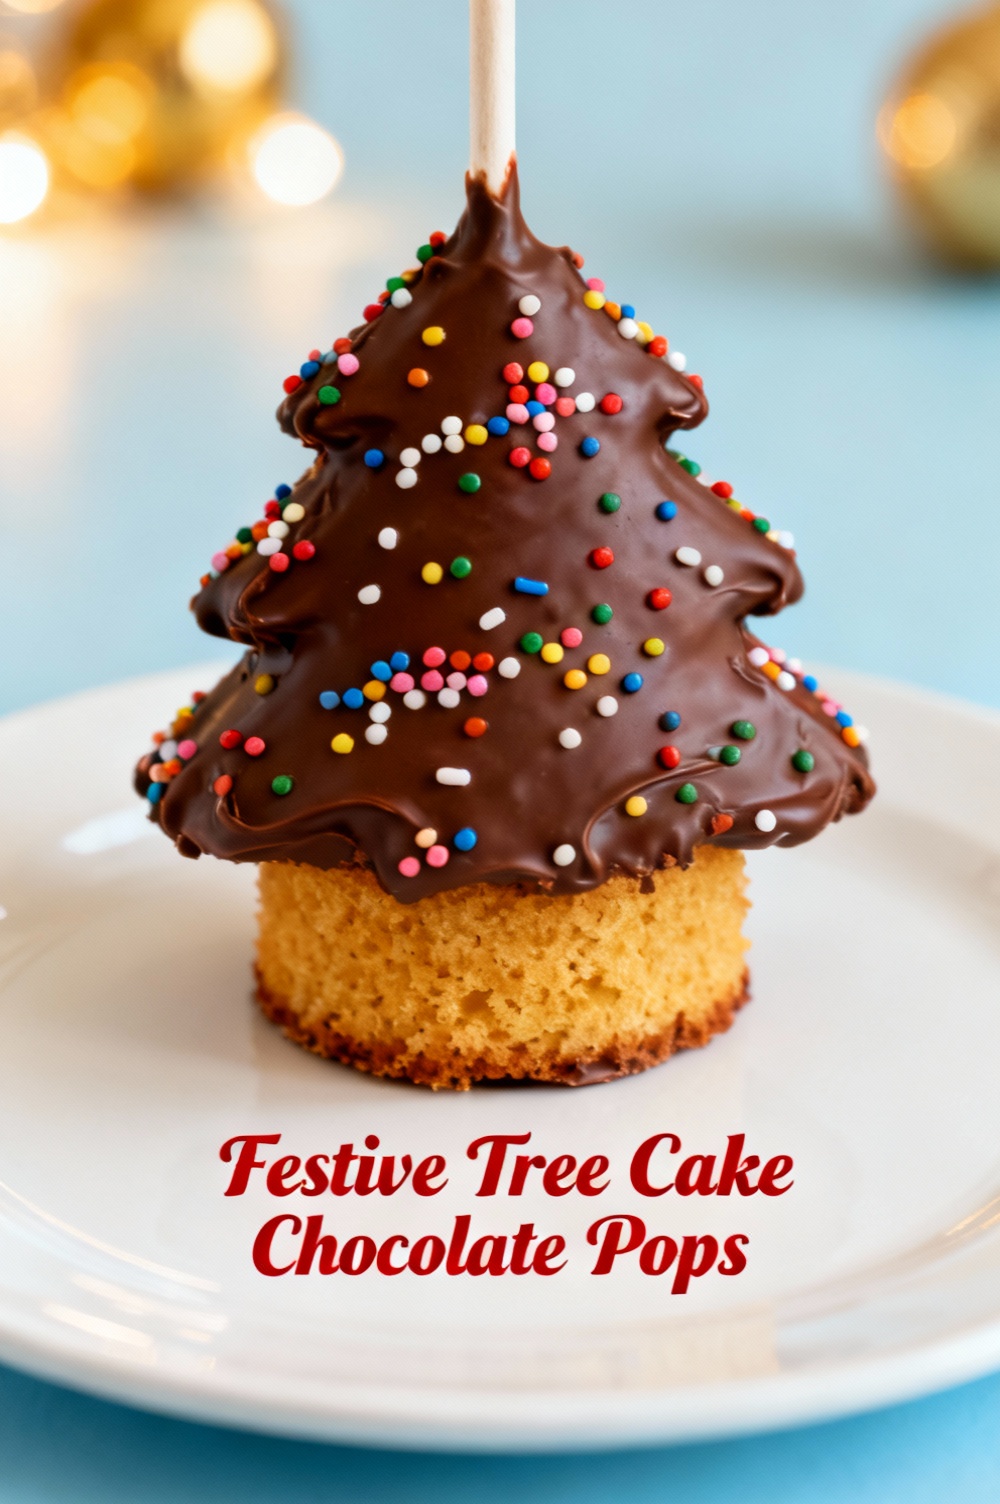
Cute chocolate cake pops dressed up as Christmas trees — dipped in green chocolate and decorated with sprinkles and a star.
Ingredients
- 1 (15.25 oz) box chocolate cake mix (plus ingredients called for on the box) — baked, cooled and crumbled (about 6 cups cake crumbs)
- 1 cup buttercream frosting, room temperature (store-bought or homemade)
- 12 oz green candy melts (or green melting wafers)
- 4 oz semisweet chocolate, chopped (for trunk/accents)
- 2 tbsp vegetable shortening (optional — to thin candy melts if needed)
- 12 lollipop sticks or wooden skewers (4–6 in)
- 12 small star-shaped sprinkles (or yellow sugar stars)
- Assorted festive sprinkles/nonpareils
- Parchment paper or a silicone mat
- Styrofoam block or a drying stand (to hold pops upright while setting)
Instructions
- Prepare the cake: bake the chocolate cake according to box instructions (or use your favorite recipe). Cool completely, then crumble into fine crumbs in a large bowl.
- Add the frosting: stir in the buttercream a little at a time until the mixture holds together when squeezed. You want a moist, moldable dough — not sticky.
- Shape the trees: take about 2 tablespoons of the cake mixture and form into a small cone (wider at the base, pointed at the top). Repeat to make 12 cones. Make a small flat area at the base so each tree can sit upright if needed.
- Insert sticks and chill: insert a lollipop stick halfway into each cone (don’t push all the way through). Place the pops on a parchment-lined tray and freeze or refrigerate for 15–20 minutes to firm up.
- Melt coatings: in a microwave-safe bowl, melt the green candy melts in 20–30 second intervals, stirring between bursts until smooth. If too thick, stir in 1/2–1 tsp vegetable shortening at a time until you reach a coating consistency. In a separate bowl, melt the semisweet chocolate for trunks/accents.
- Dip the pops: remove chilled cones from fridge. Hold a pop by the stick and dip into the green melts, fully coating. Gently tap the stick on the edge of the bowl to remove excess coating. Place back on parchment or insert into a styrofoam block to dry upright.
- Decorate quickly: while coating is still wet, add sprinkles and place a small star at the tip. Use the melted semisweet chocolate to pipe a small rectangle at the base of each tree to mimic a trunk (or dip just the bottom in semisweet chocolate).
- Set completely: allow the pops to set at room temperature until firm, or refrigerate briefly (5–10 minutes) to speed up setting. Avoid long refrigeration if using glossy candy melts to prevent bloom.
- Serve or store: serve within 48 hours for best texture. Store in an airtight container at cool room temperature or in the fridge for up to 3 days (bring to room temp before serving if chilled).
Nutrition Information
- Calories: 220 kcal
- Cholesterol: 20 mg
- Sodium: 110 mg
- Carbohydrates: 26 g
- Fiber: 1 g
- Sugar: 18 g
- Protein: 2 g